|
|
|||
Graduation Party Invitations
A graduation party is an important milestone. It signifies the start of a new life and a new beginning. And it celebrates a great accomplishment! If you are especially particular like I am than you may have no other choice but to make the graduation party invitations yourself. The store bought selection is sparse and a lot of times, not very pleasing.
|
||||

- 8.5 by 11 Cardstock
- decorative/scrapbooking paper
- lined notebook paper
- graduation themed stickers
- glue or adhesive runner
- decorative scissors (paper edgers)
Step One: Getting the words on paper. There are two parts for this exercise. Create the text for the inside of the card (i.e. the who, when, where, date and time of the graduation party) and also to create the "You're Invited" text for the front of the card.
To execute the first part of this step as easy as possible you can
A. - purchase pre-made cards that are blank and ready to print on, or, as I recommend
B. - buy some 8 1/2" by 11" cardstock and either have it cut in half for you at a local copy or print shop or
cut it yourself with a good hand paper cutter.
Use either
your computer to create the text for the inside and front of the invitation. We also have some free invitation templates created to help you set up the text to print two invites per sheet.
For the text on the front of the graduation party invitations will prove to be a little more tricky. When creating this text you can easily set it up as regular sized document (the standard being 8 1/2" by 11"). To create this text graphic make a box sized 2" by 2 1/2". Insert the text to the middle of this box and Align it to the center. Repeat this so that you have several on a page or as many as you can fit. Print these
onto lined notebook paper.
Step Two: Next create a decorative background for the graduation party invitations. Do this by cutting rectangles out of a decorative paper of your choice (I chose a scrapbooking background paper by Kelly Panacci called That's Life). Cut these rectangles sized at 5" by 4". You may want to cut them bigger if you have larger sized cards. My dimensions were based on a card sized at 5 1/2" by 4 1/4"
Once you have your paper cut into rectangles you will use a ruler and pencil to draw margins on the back of the paper about 1/4" in from the edge. These margins are meant to use as a guideline for cutting the edges with decorative scissors (paper edgers) or pinking shears. It's harder than you think to cut these without the margins and still have them come out straight!
A good short-cut for this step would be to create boxes sized at 4 1/2" by 3 1/2" on a desktop publishing document or word processor. Print these boxes out onto the back of the decorative paper and simply cut them straight out of the paper with the decorative scissors.
Now move on to the lined notebook print out. These graphic embellishments will be torn out of the page for added effect. To make this a little easier fold the page where you want to tear along.
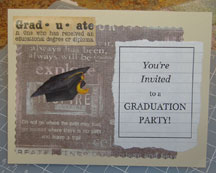
Step Three: Assembly! Use a glue stick or adhesive runner to first attach the decorative paper rectangles to the front of the card. Attach them aligned and centered to the left hand side of the invitations.
Next attach the "you're Invited" text squares (torn out lined notebook paper). Attach these with a gluestick as well, aligning and centering them to the right of the card.
Step Four: The finishing touches. In other words, the graduation party stickers. This is what really makes the graduation party invitations. The stickers I used were from the Frances Meyer company. You can use any graduation themed stickers or even scrapbook embellishments.
I used a square-ish shaped sticker for the upper left corner making sure to overlap the paper. I then placed a graduation cap sticker into the middle left side of the card. You can do something similar with these stickers or play it up however you want to.
return to Do It Yourself Invitations Homepage
The DIYI Ezine
Printable Invitations | Bridal Shower | Blog | Contact | Advertising Policy | Privacy Policy
By Chris Fleckenstein, Copyright © 2006-2013 Do-it-yourself-invitations.com


