|
Make Your Own Barbecue Invitations
Tips and Ideas to Create Handmade Cookout Or Barbecue Invitations
Right at the top of the list of my all time favorite parties or events is the backyard barbecue! I just love the summertime weather paired with the mother of all food indulgences; kicking back with family and friends. Gathering for a cookout is one of lifes simple pleasures that are so close to to perfect heaven!
I also love to throw a bit of DIY flair into my backyard parties. Starting with the invitations! DIY lanterns, homemade place mats, not to mention all of the great home cookin' and barbecue. All of these things lend a great personal touch to your parties that will be remembered for years to come.
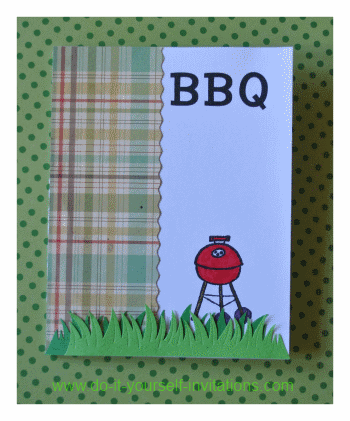
Supplies used to make barbecue invitations:
8 1/2" by 11" white cardstock
decorative or scrapbooking paper
green paper or grass embellishments*
rubber stamping products (stamp & ink)
colored markers
I created the base of this invitation by printing the wording onto some plain white 110 lb. cardstock. I have created a template that is free to download as an easy shortcut, but you could also simply use blank cards and a BBQ theme rubber stamp.
To use my printable barbecue invitations template you will need to print the pdf template onto 8 1/2" by 11" cardstock. To print some personalized wording to the inside of the invitations visit the invitations text template page to download the appropriate text template. Both templates will need to be printed facing back to back. After printing cut the paper in half to create two separate cards. Fold the pieces in half to create a folded greeting card style invitation.
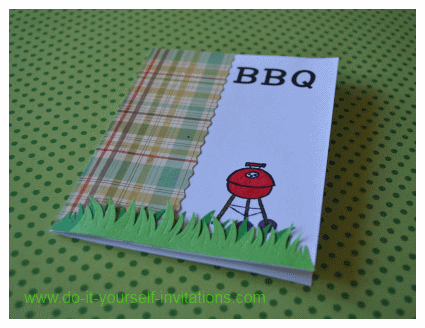
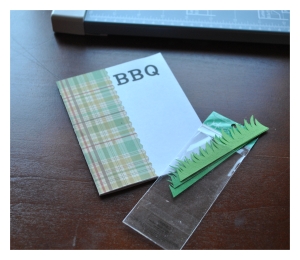 To create the barbecue invitations pictured here I started by measuring and cutting some decorative scrapbooking paper down to smaller rectangles to attach to the front of the invite. I measure the pieces at about 2 - 2 1/4" and then went over one edge with some paper edgers with a pinking sheer texture, to get the zig zag pattern you see on the right edge of the plaid paper. I attached the cut pieces of paper to the left side edge of the cards using a permanent adhesive glue runner. To create the barbecue invitations pictured here I started by measuring and cutting some decorative scrapbooking paper down to smaller rectangles to attach to the front of the invite. I measure the pieces at about 2 - 2 1/4" and then went over one edge with some paper edgers with a pinking sheer texture, to get the zig zag pattern you see on the right edge of the plaid paper. I attached the cut pieces of paper to the left side edge of the cards using a permanent adhesive glue runner.
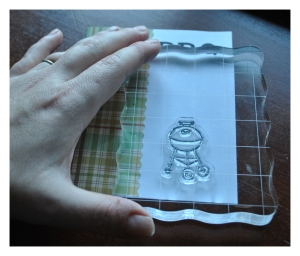 Next I used a clear rubber stamp to apply the image on the front of the card. Clear stamps are basically the same as a rubber stamp, although they are clear so you can see right through them. Also, you mount them yourself onto a clear piece of acrylic plastic and peel the image off when you are done to store and use another day. The great thing about them is that you can see where you are stamping so there are much fewer mess ups. Aaannndd you can see exactly where the ink is on the stamp so you know you have a nice even coating of ink on the stamp. I LOVE them. Oh yeah, and they are much less expensive than a traditional wood mounted stamp, to boot. Next I used a clear rubber stamp to apply the image on the front of the card. Clear stamps are basically the same as a rubber stamp, although they are clear so you can see right through them. Also, you mount them yourself onto a clear piece of acrylic plastic and peel the image off when you are done to store and use another day. The great thing about them is that you can see where you are stamping so there are much fewer mess ups. Aaannndd you can see exactly where the ink is on the stamp so you know you have a nice even coating of ink on the stamp. I LOVE them. Oh yeah, and they are much less expensive than a traditional wood mounted stamp, to boot.
So basically I simply mounted the image to my clear acrylic block, coated it with black ink, and stamped right to the front of my barbecue invitations.
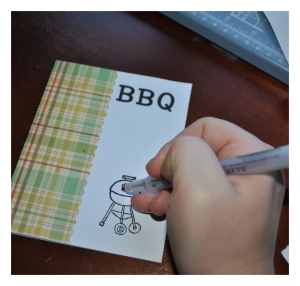 After stamping my images I really wanted to add some interest to the image on the front of the invite, so I decided to color it in with some colored markers I had lying around. I chose some appropriate colors and filled everything in. The markers I used were from a Martha Stewart set I got on sale from Michaels crafts. But just about any art marker will do. If you are reeaaalllyy into markers and cardmaking then Copics (markers) are a very popular choice in creating this kind of art. Although they are on the expensive side. After stamping my images I really wanted to add some interest to the image on the front of the invite, so I decided to color it in with some colored markers I had lying around. I chose some appropriate colors and filled everything in. The markers I used were from a Martha Stewart set I got on sale from Michaels crafts. But just about any art marker will do. If you are reeaaalllyy into markers and cardmaking then Copics (markers) are a very popular choice in creating this kind of art. Although they are on the expensive side.
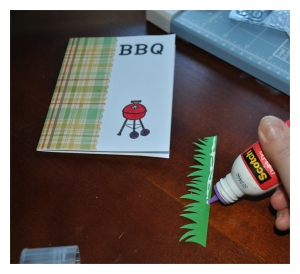 The last step I took was adding the grass embellishment to the bottom of the barbecue invitations. I chose a ready made embellishment made by Jolee's. But you could simulate the same technique using several other methods. The last step I took was adding the grass embellishment to the bottom of the barbecue invitations. I chose a ready made embellishment made by Jolee's. But you could simulate the same technique using several other methods.
The grass embellishments I used were to different shades of green paired together. So to re-create the same effect you may want to choose two different papers in separate shades of green. The good old fashioned way we made paper grass as kids was to cut out a couple of strips of green paper and then cut slits into it. This same technique will work perfectly fine! Make sure and kind of scrunch up the "blades" of grass and bend them for texture. You could also snip them all curved and willy nilly the same exact way that the Jolee's grass was created.
Another way to create the paper grass would be to use a die cut machine. Find a paper texture die cut and go to town with some different colored papers. You can add even more interest and dimension by choosing papers that have green patterns! Make it all a bit more funky! Or even add a bit of green distressing ink to the edges of the paper grass.
Adding the paper grass to the invitations is a great way to add texture and interest, as well as a good pop of color. And if you do not want to go the route of paper grass, remember you can always play with textures such as pipe cleaners, feathers, or pieces of dyed cloth or hemp cord.
|


 To create the barbecue invitations pictured here I started by measuring and cutting some decorative scrapbooking paper down to smaller rectangles to attach to the front of the invite. I measure the pieces at about 2 - 2 1/4" and then went over one edge with some paper edgers with a pinking sheer texture, to get the zig zag pattern you see on the right edge of the plaid paper. I attached the cut pieces of paper to the left side edge of the cards using a permanent adhesive glue runner.
 Next I used a clear rubber stamp to apply the image on the front of the card. Clear stamps are basically the same as a rubber stamp, although they are clear so you can see right through them. Also, you mount them yourself onto a clear piece of acrylic plastic and peel the image off when you are done to store and use another day. The great thing about them is that you can see where you are stamping so there are much fewer mess ups. Aaannndd you can see exactly where the ink is on the stamp so you know you have a nice even coating of ink on the stamp. I LOVE them. Oh yeah, and they are much less expensive than a traditional wood mounted stamp, to boot.
 After stamping my images I really wanted to add some interest to the image on the front of the invite, so I decided to color it in with some colored markers I had lying around. I chose some appropriate colors and filled everything in. The markers I used were from a Martha Stewart set I got on sale from Michaels crafts. But just about any art marker will do. If you are reeaaalllyy into markers and cardmaking then Copics (markers) are a very popular choice in creating this kind of art. Although they are on the expensive side.
 The last step I took was adding the grass embellishment to the bottom of the barbecue invitations. I chose a ready made embellishment made by Jolee's. But you could simulate the same technique using several other methods.