|
|
|||||||
|
Chic Beach Pocketfolds!
by Cory C.
beach wedding invitations pocketfold
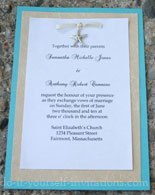
I designed, printed, cut, and assembled each invite by hand. Supplies For 100 pocketfold invitationsPockets & Paper From CardsandPockets.com This company is so wonderful! We ordered multiple samples to make sure we found the perfect color and texture. 8 1/2" x 11 bulk Snow White Cardstock: $4.95 per 50 pack = $24.75 5 x 7" Signature Pocket Fold - Harvest: .69 each = $69.00 Invitation Mat - Lagoon: .18 each = $18.00 Mailing Envelope - Lagoon: .15 each = $15.00 Snow White Belly Bands: $8.95 per 50 pack = $17.90 Total Paper Cost - $144.65 Wax Seal Supplies from www.letterseals.com The people from this company were great! They were so, so helpful in advising me which wax to choose and understanding of my indecisiveness! 1” starfish seal - $10.00 Aladine Glue Gun wax in Turquoise - $4.00 each $38.00 – used a 15% off coupon = 32.30 Michael's Crafts Tombo Permanent adhesive Raffia $16.00 Other Supplies Glue gun Printer & ink My invitations came out to be $2.23 each! MEASUREMENTS Invite 4 1/2”x6” = 2 to a sheet of cardstock Directions 3 1/2” x 6” = 3 to a sheet Reception 3 1/2” x 5 3/4” = 3 to a sheet RSVP 3 1/2” x 5” = 4 to a sheet (postcard) Accommodations 3 1/2” x 4 1/4” = 4 to a sheet DIRECTIONS I created and formatted the design for each invitation and inserts on Microsoft Word. The fonts used were Albemarle Swash and Aubrey, downloaded free from Dafont.com. We printed everything ourselves at home. We took everything to FedEx to have the paper cut with their laser cutter ($1.25/cut x 24 cuts). Once everything is cut, you can assemble the invitations. Apply a strip of adhesive on all four sides of the mat and place on the center of the pocketfold. Repeat this step on the invitation and place on top of the mat. Place one of each insert into the pocket in descending order. Once finished, center the invite on the belly band. Secure the band on the back of the invite with some glue. Wrap the band with a piece of raffia and hold secure. Squeeze a small amount of wax over the raffia and press down the seal. Let it sit for a minute or two. I recommend practicing on scrap paper before you start sealing the invitations.
|
Popular DIY Tutorials |
|||||||
|
|
||||||||
|
| Homepage | Shop | Wedding Invitations | Birthday Invitations | Baby Shower Invitations | Printable Invitations | Bridal Shower | Blog | Contact | Advertising Policy | Privacy Policy
By Chris Fleckenstein, Copyright © 2006-2013 Do-it-yourself-invitations.com |
||||||||


