|
|
|||||
|
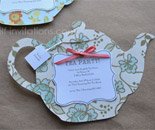
DIY Bridal Shower Tea InvitationsThese bridal shower tea invitations can be a little time consuming but are so cute and will make a great impression when sending them out for your event. I actually cut the little tea pot and cup out by hand but there are much easier options. Try using a paper punch or die cut machine with a tea pot theme. If you want to cut them by hand you can also simply print a tea pot shape onto the back of your paper and use it as a cutting guideline.
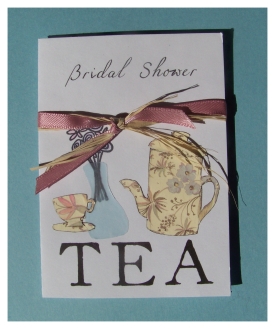 Materials needed to make these bridal shower tea invitations:
I made these bridal shower tea invitations using some blank cards I bought at target. They are on the small size so they make a sort of mini invite, but they are so cute! They are 3.5" by 4.85". I have included a printable bridal shower tea invitations template for you to print them at the same size, or simply make these by printing onto a normal sized 8 1/2" by 11" card stock and then cut it in half to make two invitations. I have included a second bridal shower invitation template for printing either 1/4 fold invitations from normal 20 lb. paper, or you can create 2 invitations to a page. To print 2 to a page just print the template onto card stock. Flip it over and print again onto the back of the card stock, yet rotating so it is upside down. Cut the paper in half and then fold each half to create two bridal shower tea invitations form one sheet of paper. After printing and folding your invitations you'll need to create the decorations for the front. Pick out a decorative paper to match your event or colors. You will use this paper to create the tea pot and tea cup shapes on the front of the invitations. Like i said, I cut mine by hand, but there really is a much easier way to go about it. There are a few less expensive model die cutting machines out there to use to get a tea pot shape cut out easily and quickly. You could even try finding a simple paper punch with a tea pot and tea cup shape. If neither of these options appeal to you, you can also simply print a tea pot shape onto the back of the decorative paper and then use this as a guideline for cutting. You can even use a rubber stamp. Pick a rubber stamp with a tea pot shape and stamp it onto the front of the paper. Cut this out very close to the lines so you can see the outline from the rubber stamp shape. Use the cut out to decorate the front. After creating these shapes you will want to go over the edges of the paper with a distressing ink or even just a plain old magic marker. Only do this if you used any of the methods other than using a rubber stamp to get your tea pot and cup shapes. You do not need to get the ink on the front of the paper, but just the actual edges. The sides of the paper. This is to give the paper shapes a little emphasis against the white background. I went one step further and added a little flower bouquet in a vase, as well. I did this using a rubber stamp to create the flowers and a piece of light blue vellum to create the "vase". I simply stamped the bouquet onto the card with plain black ink. Green would look good too. I cut a piece of vellum into the shape of a vase (freehand) and glued it right on top of the flower stems. I then went back and colored the flowers in with a colored pencil. Lastly I used some fast drying glue applied in a very thin coat to the back of the tea pot shapes to attach them to the card. The very last step was to tie both the ribbon and raffia around the front of the bridal shower tea invitations into a simple knot. I trimmed the ends of the ribbon to make them uniform and done!
|
See also...
|
|||||
|
|
||||||
|
| Homepage | Shop | Wedding Invitations | Birthday Invitations | Baby Shower Invitations | Printable Invitations | Bridal Shower | Blog | Contact | Advertising Policy | Privacy Policy
By Chris Fleckenstein, Copyright © 2006-2013 Do-it-yourself-invitations.com |
||||||

