|
Make Bamboo Wedding Invitations
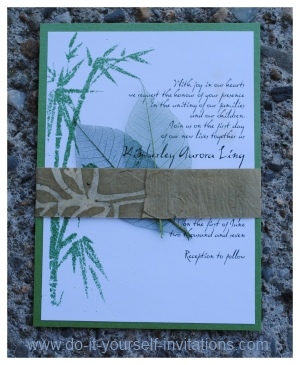
Bamboo wedding invitations are somewhat of a classic go-to invitation style for Asian themed/ style invitations. There are several online stores and DIY kits to choose from to get this style of invitation, but I also want to show how you can create this style yourself, and on very short money. In this particular tutorial I will use a rubber stamp, but add some richness to the invite by also using some embossing ink. I really love using rubber stamp images for creating DIY wedding stationery. It is such a great, affordable way to create a branded and matching set of stationery and wedding crafts. Even better when you are using clear stamps, which typically come as a set of several matching images. Grab yourself some coordinating colored papers and inks and your on your way to some fabulous DIY wedding invitations.

Supplies I used to make these bamboo wedding invitations:
8 1/2" by 11" green metallic sheen cardstock
white cardstock
olive green embossing ink
OR
clear embossing ink and olive green embossing powder
heat embossing tool
glue runner
handmade or decorative paper (for belly band)
green skeleton leaves
I started by creating the wording for this invitation and printing it onto some regular 8 1/2" by 11" cardstock. The easiest way for you to do this would be to print the wording side by side using Microsoft Word or one of my free printable templates. Using the templates form this site you can print the wording two to a page side by side and then use our handy cutting guidelines to cut the wodring down to a 5 by 7" or smaller invitation card, depending on the needs of your project. In the case of this particular invitation, you will but the paper to just a tad smaller then 5 by 7.
Print the wording so it is conservatively aligned to the left or right side of the page (I prefer the left). You'll want to make sure you leave enough room for the rubber stamp image. A great way to insure that the sizing and alignment is right is to print one copy and do a test run.
After printing the wording trim all of the cardstock to size. You can do this by hand to save some money, but I recommend bringing it to a copy or print shop for cutting services if you have a large amount of invites to create. It is very tedious work. But, having it cut for you is super fast, easy, and cheap!
The green backing cardstock should be cut to 5" by 7" and the white printed cardstock just a bit smaller, at around 4.5" by 6.5".
Of course, to create bamboo wedding invitations, we'll need to add a bamboo accents next. This is where the rubber stamps and embossing comes in. I chose a clear stamp set filled with Asian inspired accents, one of which, was a large bamboo shoot graphic. To use clear stamps you also need an acrylic block to mount your stamp on. Although, keep in mind, you can use any stamp you might come across. If you do a search online you are bound to come across several bamboo stamps and accents.

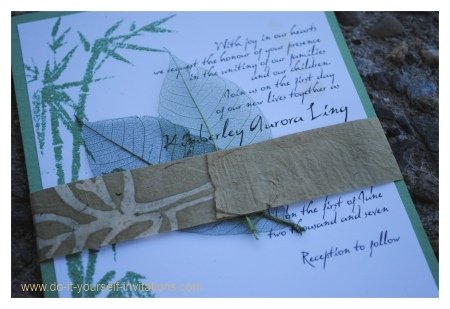
I used some olive green embossing ink and some clear shiny embossing powder to give the image a nice raised printed look and to add some rich texture. To heat emboss the bamboo image onto the invitations, start by inking your image onto the printed white cardstock. Immediately cover the image in a bit of embossing powder. Make sure the entire image has a sheen of powder over it. Shake off teh excess. I always use a paper plate or newspaper under my work surface to collect any mess.
Use the heat embossing tool to bake the embossing powder onto the cardstock paper. Hold it a few inches away from the paper, and starting at the top of the image, work your way downwards over the entire image until it is done. You will be able to literally watch it transform before your eyes.
After embossing the top layer of the invitation, use a glue runner to attach the white cardstock to the green cardstock backing. Center the papers together as best as you possibly can.
Next create a belly band to wrap around the outside of the invitation. You can use the belly band to tuck in your RSVP and other invitation inserts. To create the bellyband for this invite I simply cut some strips from some handmade paper, using my personal paper cutter. I used the attached rulers to trim the pieces to about 1" width. I wrapped the bands around the outside of the invite and then secured it form the back with a bit of glue runner adhesive. To finish, I tucked in a green skeleton leaf.
Creating Bamboo Wedding Invitations RSVP and Inserts
You can create the inserts for your bamboo wedding invitations in much the same manner as what I have described above. Simply adjust the sizing for each piece that you create. There are some standard sizes for pieces such as the RSVP. The only reason to stick with this sizing is so that you can buy appropriately sized envelopes affordable and easily. Otherwise, don't feel bound to create pieces to any certain size standards. Simply choose a size that will fit well with your invitation and design. I like to do away with the RSVP envelope altogether and go with responding by phone, email, or wedding website. Doing this is cheaper too!
Products used to make these bamboo wedding invitations...
Inkadinkado Clear Stamps #98626 Asian By Design/Design asiatique
Fonts
Dali Font - you can find it at Dafont.com
Orchidee Font
Korean Calligraphy
Do It Yourself Invitations Homepage > Make Your Own Wedding Invitations > Bamboo Wedding Invitations
|


