|
Asian Wedding Invitations
Tips and Ideas To Make Your Own DIY Asian Wedding Invitations
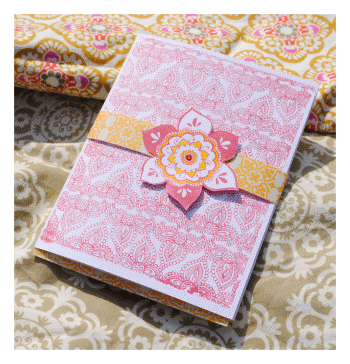
Having an Asian inspired wedding? You'll certainly need some invitations that really stand out and pop. What better way to get the perfect invitations to match your wedding than to make them yourself? I find myself rather inspired to teh colors and patterns of Asian inspired weddings. I happened to get my hands on a very cool rubber stamp with some Asian/Indian inspired patterns and images and, well, I went to town with it! Here is What I came up with.
List of Materials Used To Make These Asian Wedding Invitations:
8 1/2" by 14" cardstock (or 11 x 17)
Asian Inspired rubber stamps - I used Fiskars Henna Petals clear stamp set
ink pad
coordinating decorative paper
accent ink
rhinestones
glue runner
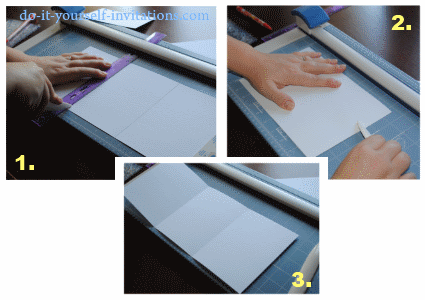
To make these Asian wedding invitations I started by creating a tri-fold card for the base of the invitation, much like a gatefold but instead of folding only halfway to 3/4 of the way inward, this one folds almost entirely to the inside edges.
One of the stamps I chose was actually one large block pattern in which I intended to stamp onto the entire outside of the card/wrap for the outside of the Asian wedding invitations, so I started by measuring the stamp which was about 4 5/8" by 6". I multiplied the shorter side by 3 to come up with the length the paper should be to create the tri-fold card. In this case it was 13 7/8". I trimmed some 11 x 17 cardstock to size by hand using my personal paper cutter. If you are planning on making a large quantity I suggest having the paper cut to size for you. If you bring it to a local print or copy shop they provide this service every inexpensively.
After creating the tri-fold cards for the base of the Asian wedding invitations, I moved on to stamping the pattern to the outside of the card. Since I was using a clear rubber cling stamp I started by mounting the stamp to a large acrylic block. If you are new to clear stamps, don't worry this is super easy. In order to use clear stamps you need to purchase an acrylic block in the appropriate size for your stamps to mount to. You do not need anything extra in order to mount them. They stick very well all on their own. And they happen to be the best invention ever when it comes to rubber stamping and cardmaking! Since everything is clear you can see where you are making the impression very well. Makes for much less mess-ups and do-overs!
So, I mounted my clear stamp to the acrylic block and inked it up. I chose to use a bright ruby red chalk ink pad. I love chalk ink! It just makes for a great impression and looks stunning if you purchase a good quality ink pad. I came to the conclusion of red after testing many inks and colors. Red just looked the most stunning and Bali-esque. So after inking I set out to stamp the image once onto each panel out the tri-fold card, centering as best as I could for each panel. I stamped the outside only, although I think it would look perfectly nice to do the inside of the card as well, since the tri-fold is mostly a sort of invitation wrap, and mostly decorative.

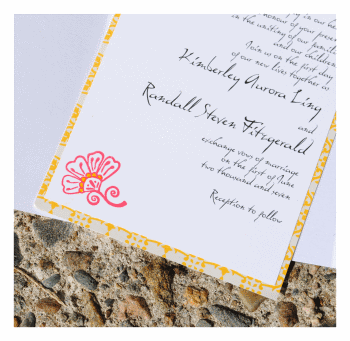 Next I went on to printing the inside part of the invitation. The actual printed wording and such. To make things super easy you may want to try using our free printable invitation template to set up your text so that it is two to a page and also has cutting guidelines to cut it to a perfect 5 x 7 invitation. Then all you must do is trim it down a bit from there to fit whatever size you want to use. Next I went on to printing the inside part of the invitation. The actual printed wording and such. To make things super easy you may want to try using our free printable invitation template to set up your text so that it is two to a page and also has cutting guidelines to cut it to a perfect 5 x 7 invitation. Then all you must do is trim it down a bit from there to fit whatever size you want to use.
I set up and printed out teh wodring for the invitation onto some nice white cardstock. I also chose a decorative paper with a nicely complimenting pattern to it, and trimmed it down to a size slightly larger than the white cardstock. I attached the cardstock with the wording printed onto it to the decorative paper backing using a permanent adhesive glue runner.
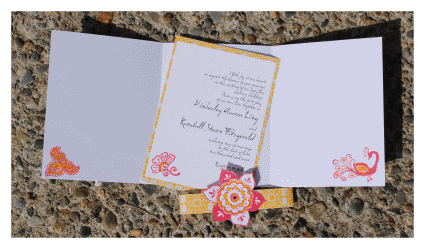
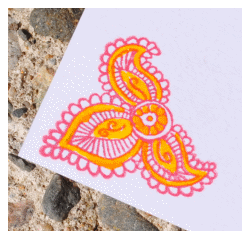 The next step I took was to add some decorative accents using other rubber stamps from teh set. I chose one to apply straight onto the actual invitation (the card with the wodring printed onto it). I also chose a couple others to stamp onto the inner corners of the tri-fold invitation wrap. I stamped everything in the same red chalk ink, but I went a couple steps further by adding some accents to the stamped images. I used some yellow pearlized accent ink from Smooch to paint on some pretty accents within the stamped images. The next step I took was to add some decorative accents using other rubber stamps from teh set. I chose one to apply straight onto the actual invitation (the card with the wodring printed onto it). I also chose a couple others to stamp onto the inner corners of the tri-fold invitation wrap. I stamped everything in the same red chalk ink, but I went a couple steps further by adding some accents to the stamped images. I used some yellow pearlized accent ink from Smooch to paint on some pretty accents within the stamped images.
To add some finishing touches to the Asian wedding invitations I created a belly band with a decorative seal, of sorts. I used the large flower shaped punch from the Henna Petals stamp set and stamped it onto some of the scraps left over from trimming the cardstock down to size. I used the same yellow accent ink to add some colorful accents to this stamp as well. I then got out my craft knife and cut the flower from the paper by hand. You could also simply use a small precision set of scissors. Whatever works best for you.
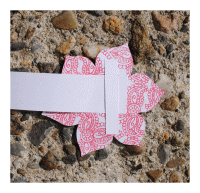 I created a belly band using the same decorative paper I used to back the invitation with. I attached the flower stamp in which I cut out from the paper, to the end of the belly band by applying a small strip of glue from my glue runner. I wanted to create a sort of "belt form this belly band, so I also attached a very small strip of cardstock facing vertically onto the back of the flower seal attached to the belly band. This way, after wrapping the band around the Asian wedding invitations I can slide the end through teh strip of cardstock holding the whole thing together. This way the belly band can be removed and then replaced without ripping it! I created a belly band using the same decorative paper I used to back the invitation with. I attached the flower stamp in which I cut out from the paper, to the end of the belly band by applying a small strip of glue from my glue runner. I wanted to create a sort of "belt form this belly band, so I also attached a very small strip of cardstock facing vertically onto the back of the flower seal attached to the belly band. This way, after wrapping the band around the Asian wedding invitations I can slide the end through teh strip of cardstock holding the whole thing together. This way the belly band can be removed and then replaced without ripping it!
Do It Yourself Invitations Homepage > Make Your Own Wedding Invitations > Asian Wedding Invitations
|


 Next I went on to printing the inside part of the invitation. The actual printed wording and such. To make things super easy you may want to try using our free
  The next step I took was to add some decorative accents using other rubber stamps from teh set. I chose one to apply straight onto the actual invitation (the card with the wodring printed onto it). I also chose a couple others to stamp onto the inner corners of the tri-fold invitation wrap. I stamped everything in the same red chalk ink, but I went a couple steps further by adding some accents to the stamped images. I used some yellow pearlized accent ink from Smooch to paint on some pretty accents within the stamped images.
 I created a belly band using the same decorative paper I used to back the invitation with. I attached the flower stamp in which I cut out from the paper, to the end of the belly band by applying a small strip of glue from my glue runner. I wanted to create a sort of "belt form this belly band, so I also attached a very small strip of cardstock facing vertically onto the back of the flower seal attached to the belly band. This way, after wrapping the band around the Asian wedding invitations I can slide the end through teh strip of cardstock holding the whole thing together. This way the belly band can be removed and then replaced without ripping it!